From the Measure Set-Up
page click on the Add Measure to Project
button.

Click the Create New
Measure button.

The Create New Measure page is displayed.
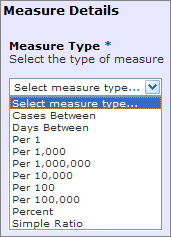
Select the Measure Type:
Cases Between - Measures the cases between events.
Days Between - Automatically calculates the time between events.
Per 1 - Performs no calculations. Useful for plotting counts or numerator only measures.
Per 100 - Divides the numerator by the denominator and multiplies the result by 100.
Per 1,000 - Divides the numerator by the denominator and multiplies the result by 1000.
Per 10,000 - Divides the numerator by the denominator and multiplies the result by 10000.
Per 100,000 - Divides the numerator by the denominator and multiplies the result by 100000.
Per 1,000,000 - Divides the numerator by the denominator and multiplies the result by 1000000.
Percent - Divides the numerator by the denominator and multiplies the result by 100 and shows the result as a percent.
Simple Ratio - Divides the numerator by the denominator.
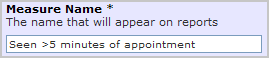
Enter the Measure Name,
this appears on data entry forms and reports.
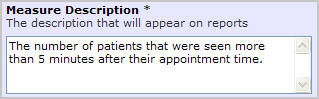
Enter the Measure Description,
this will be displayed from the details
link on the team's measures list as well as on the team's progress report.
Enter the Reporting Start Date, this is the date you would like the teams to start reporting from.
Enter the Chart End
Date, by Default the chart
on the data entry page will display all data entries plus the next few
items (no data).
The Project End Date can be
selected to display the chart with all entered data and zero values for
all items to the end of the project.
Alternatively any Other Date
may be entered to define the end date for the chart.

Select the Reporting Frequency, it can be:
Daily
Weekly
Monthly
Quarterly
Yearly
Bi-Monthly
Select the Measure Category, there are three options:
Outcome - Voice of the customer or patient.
Process - Voice of the workings of the system.
Balancing - Looking at a system from different directions/dimensions.
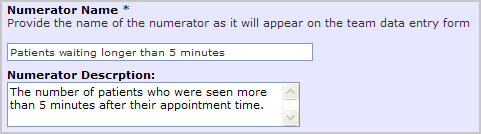
Enter the Numerator Name, the label that will be displayed on data entry forms and reports.
Enter the Numerator
Description.
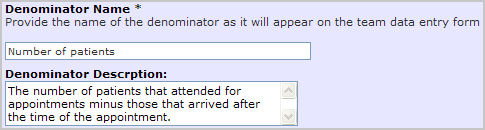
Enter the Denominator Name, the label that will be displayed on data entry forms and reports.
Enter the Denominator
Description.
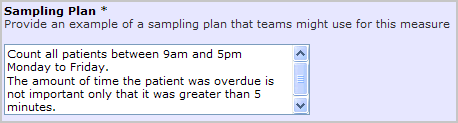
Enter a Sampling Plan
that teams might use for this measure.
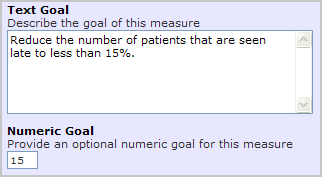
Enter a Text Goal for the measure if appropriate.
Enter a Numeric Goal,
this will be displayed as a goal line on the graph.
In the Y-Axis Label field enter the text to appear for the Y-Axis.
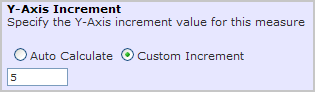
Specify the Y-Axis
Increment value for the particular measure selected or allow to
auto calculate based on the measure values entered.
For the Y-Axis Calculation,
leave this checked if you want the Min
and Max values on the Y-Axis to
be calculated based on the data. Otherwise uncheck this and manually enter
the Min and Max values.

To add the measure to the Library select the Library Information check box. Once added to the library other projects will be able to use this measure to report on.
Check the topics that you want to add this measure to.
Before saving you should Preview the measure to test that it displays as planned. Click here to see how to Preview a measure.
Click the Save button.